BEFORE YOU START
Please note that Nimbus removal is a 2-staged process and must be done within your Teams client as well as the Service Administration.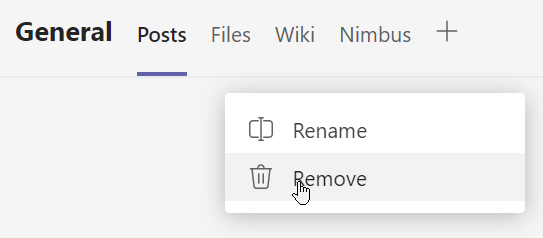
- Team Owners can trigger the Nimbus removal process via the Nimbus tab. At this point the team is already "Suspended" → More details below.
- Administrators trigger the complete removal via the Provisioning PowerShell script. Until this is done the team can be restored if needed.
If you require help with this, please contact your Nimbus customer success specialist. They will guide you through the steps below.
Step 1: Marking Nimbus for removal
| ✅Team Owners: There are two ways to remove Nimbus from an existing team in your Teams Client: | |
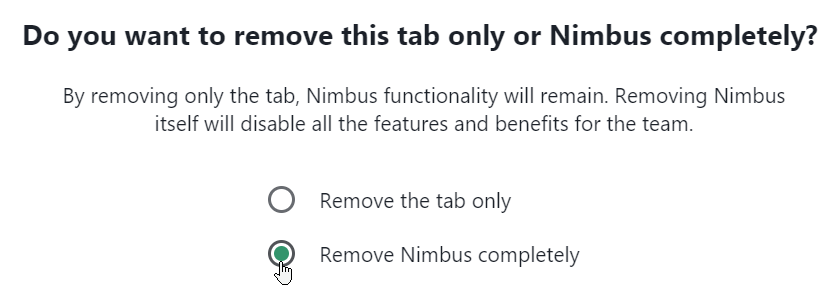
Remove Nimbus tab only |
Remove Nimbus completely |
🤔 Did you accidentally remove the Nimbus tab? A removed Nimbus tab can easily be re-added via MS teams:
|
 |

CHECKLIST: MS TEAMS CHANNEL DELETION
✅Team Owner: When completely deleting an MS Teams channel from your Teams Client, the Nimbus tab and team association is also removed.
☝When doing so, keep in mind that:
- Registered PSTN numbers may still be in effect, but...
- ... no users may take the service call under that number, as the team members are not part of Nimbus call distribution anymore.
- ... within the Service Administration the team will be shown with the status it was before channel deletion (e.g. Running or Suspended). Users may still appear associated to the team until the team is fully removed.
- Make sure to inform your Tenant Admin about this removal.
✅Tenant Admin:
- To fully remove a marked service “Pending deletion” you need to run the Provisioning PowerShell script once more → this removes all service-related entries from Azure and frees potential licenses. More on this below → Deleting a service.
- Make sure to also check for PSTN licensing and reroute your existing service numbers. You might want to look at our Use Case - Routing Unassigned Numbers to Nimbus.
Step 2: Deleting a Service in Admin Portal
✅Tenant Admin: This step can be performed by any Tenant Administrator or the Global Admin.
Delete Service
Services can be deleted either manually via the Administration UI or via Nimbus API > Delete Service method.
- Via Service Administration Interface: By clicking the "Delete" icon next to the Service you mark it for "Pending Deletion" in the Administration.
- Via Nimbus API: Deleting a Service will also mark the service to the same effect.
☝ Note that only services with User Assignment Types “Skill-based” and “None” can be deleted via API.
☝ Attention: Service Deletion

Marking a service for deletion will IMMEDIATELY disable the service.
⮑ Incoming calls will be answered with a static announcement.
⮑ A warning will appear, requiring you to confirm and consent to the deletion request. Afterwards the service will show with the State “Pending Deletion”.
Deletion via Provisioning script:
✅ The service pending for deletion will continue to exist until the deletion is confirmed via the Provisioning PowerShell script run. Afterwards the application instance of the "marked" service will be permanently removed.
✅ If you need to undo a pending deletion, please contact your Nimbus support representative.

After the deletion
Note that Nimbus Reporting historical session data of the removed Service remains accessible for Tenant Administrators only. Other user access gets removed as dictated per Reporting Roles RBAC. The data remains in storage and may be anonymized as per the Nimbus Security Whitepapers available via our Documents section.
What are the provisioning states?
The states (from top to bottom) are as follows:
INC Service Provisioning Status
| UNCOMPLETED |
The new service has been created and Service Settings can be accessed for further configuration. They exist in the Nimbus database. but still needs to be registered in Microsoft Azure using the provisioning script. Doing so will create a resource account / application instance. 🔍 Also see: Nimbus Installation and Provisioning via Microsoft PowerShell. ☝ Note: Any services remaining in this state for 30 days will be removed automatically. |
| SERVICES APPLIED | The provisioning is completed and the service is ready to be called. Nimbus will distribute calls among the service and log them for reporting statistics. |
| SERVICES RUNNING | The service has been called and calls have been recorded in the Nimbus database. |
| PSTN APPLIED | The service is now reachable via PSTN. ✅ Numbers require a PSTN phone license to operate. Also see Installation Prerequisites > PSTN licensing. |
| PSTN RUNNING | The service has been called via PSTN and calls have been recorded in the Nimbus reporting database. |
| SUSPENDED |
A service user has opted to "Remove Nimbus completely" from the services tab. 🔍 Also see: Uninstalling Nimbus. ☝ Note: After 30 days in this state the service will be → "Pending deletion". |
| PENDING DELETION |
When any admin clicks and confirms “Delete” on a service. Further processing depends on the service provisioning state:
☝ Note: Once de-registered from Azure the affected services and their settings are removed permanently. 💡 Good to know: A service that pending for deletion can still be restored by Luware IF it has not yet been completely de-registered from Azure OR completely removed from your local services instance. |
Step 2a: Running the provisioning script
✅Tenant / Global Admin: This step needs to be performed by a Tenant Administrator or Global Admin.
- Run the Provisioning Script (see Provisioning via Microsoft PowerShell for details on the script itself).
-
Confirm the newly found service changes (Team Removal) with "Yes".
⮑ At this point the service team removal is complete.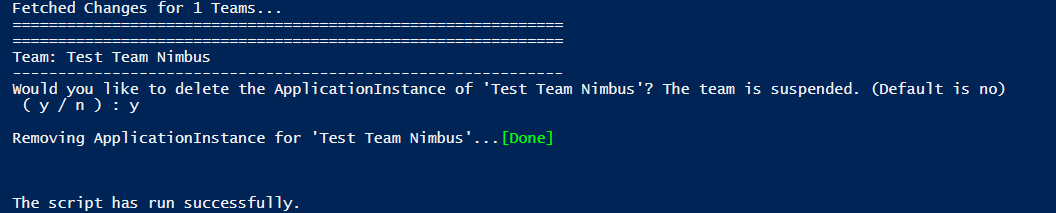
Step 3: Removing the Nimbus App from your Tenant
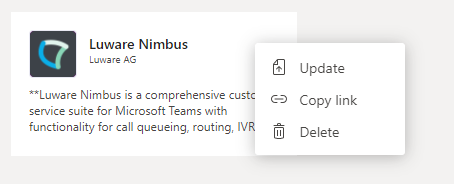
✅Tenant Admin: To remove Nimbus App from within your Tenant, perform the following steps:
- Click on "Apps"
- Select "Build for <Your Company Name here>"
- Locate the Nimbus App
- Click on "..." and select "Delete".
⮑ The App will now be removed from your Tenant
Step 4: Permanently remove all Nimbus data from your Tenant
✅Global / Tenant Admin or Account Managers:
- When you cancelled your Nimbus contract completely, you can get in contact with us after all your services have been deleted (empty Service Administration overview).
- Get in touch with your Nimbus support partner to discuss the removal of your account data. If you are not with a support partner, you can contact Luware Customer Success directly.
Troubleshooting and Support
INC Luware Support Address
| Luware Website | https://luware.com/support/ |
|---|---|
| Luware Helpdesk | https://helpdesk.luware.cloud |
| Cloud Service Status | https://status.luware.com/ |